Welcome to this blog, where I will provide you with a simple guide to connecting optical network terminals to ensure your connection is stable and reliable. Let’s take a look at the equipment and cables required and walk through the connection and setup process.
I. Confirm the equipment and cables required for connection
Before connecting the optical network terminal, make sure to prepare the necessary equipment and cables and check their integrity to ensure the stability and reliability of the connection.
1. Prepare equipment:
- Optical network terminal: Ensure that the optical network terminal has been purchased and is in good condition. Check its external and internal components to make sure there is no obvious damage.
2. Prepare cables:
-
Fiber optic cable: Choose the appropriate type and length of fiber optic cable based on your network needs. Make sure that the connection interface of the optical fiber cable is compatible with the optical network terminal.
-
Ethernet cable: If the optical network terminal needs to be connected to other network devices, prepare the appropriate type of Ethernet cable.
3. Check the cables:
-
Cosmetic inspection: Check the appearance of fiber optic cables and Ethernet cables to make sure there are no obvious wear, scratches, or other damage.
-
Connector inspection: Check the fiber optic cable’s connectors to make sure they are not bent or damaged and that the plug and receptacle are well aligned.
-
Fiber optic inspection: Check the fiber optic cable to ensure that the fiber is not bent, broken, or otherwise damaged.
4. Preparation tools:
- Fiber optic cleaning tools: Prepare fiber optic cleaning tools to ensure that the end of the fiber optic cable is kept clean during connection to reduce the loss of optical signals.
5. Connect device:
-
Connect according to regulations: According to the user manuals of optical network terminals and other equipment, connect the corresponding cables and equipment according to regulations.
-
Maintain specifications: Follow the correct connection sequence and specifications to ensure that each connection is strong and reliable.
Through the above steps, ensuring the integrity and correct connection of equipment and cables can improve the stability and reliability of optical network terminal connections and ensure the normal operation of the network.
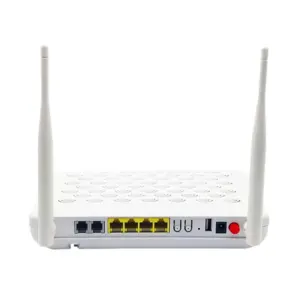
II. Find the optical fiber entrance and power interface
Before connecting the optical network terminal, you need to find the optical fiber entrance and power interface to ensure a smooth connection.
1. Find the fiber entrance:
-
Location confirmation: The fiber entrance is usually located on the back or side of the optical network terminal, which may vary depending on the device design.
-
Appearance identification: Fiber inlets usually have obvious signs, such as “Fiber In”, “Optical Input”, etc., to help users identify them.
-
Careful protection: Be careful when connecting optical fibers to avoid collision or bending of optical fibers to ensure the stability of the connection and the transmission quality of optical signals.
2. Find the power interface:
-
Location confirmation: The power interface is usually located on the back or side of the optical network terminal, and sometimes it may be located on the bottom. Look at the outside of the device to determine location.
-
Logo identification: Power interfaces are usually identified with logos such as “Power”, “DC Input”, etc., which helps users quickly identify them.
-
Prepare the power cord: After finding the power interface, prepare the power cord of corresponding specifications to ensure that the connection is correct.
3. Connection preparation:
-
Clean the surrounding area: Before connecting, make sure there are no clutter or obstructions around to facilitate a smooth connection.
-
Check the device status: Before connecting, make sure the optical network terminal is turned off to avoid accidents when connecting to the power supply.
-
Confirm power type: Confirm the type of power connector so you can choose the correct type of power cord connection.
4. Pay attention to safety:
-
Caution: Use caution during the connection process to avoid accidental damage or damage to the device.
-
Regulatory use: Follow the connection guidelines in the device manual to ensure correct and stable connection.
Through the above steps, users can accurately find the optical fiber entrance and power interface, prepare for the connection of the optical network terminal, and ensure the stability and security of the connection.
III. Connecting fiber optic cables and power cords
Before connecting fiber optic cables and power cables, make sure you have prepared the corresponding cables and confirmed the locations of the fiber optic inlets and power interfaces.
1. Connect the fiber optic cable:
-
Find the fiber entrance: Follow the previous instructions to find the fiber entrance on the optical network terminal.
-
Handle with caution: Handle fiber optic cables carefully, making sure the cable ends are undamaged and clean. Fiber optic ports are extremely precise to avoid bending or staining.
-
Insert the fiber optic cable: Gently insert the connector of the fiber optic cable into the fiber optic inlet, making sure that the plug is aligned with the interface and inserted smoothly.
-
Secure connection: Make sure the connection is secure and not loose, and avoid putting excessive pressure on the cable during the connection process.
2. Connect the power cord:
-
Find the power interface: Confirm the location of the power interface on the optical network terminal and confirm the type of power cord.
-
Insert the power cord: Gently insert the plug of the power cord into the power socket, making sure the plug is aligned with the socket, and then insert it with appropriate force until it is fully inserted.
-
Plug in power: Connect the other end of the power cord to an electrical outlet and make sure the electrical outlet is powered.
-
Confirm the connection: Confirm that the fiber optic cable and power cord are correctly connected and are not loose or incorrectly plugged.
3. Check connection:
-
Check the indicator lights: After the connection is completed, observe the indicator lights of the optical network terminal to confirm that the device has been successfully powered on and is in normal working condition.
-
Confirm the signal: If the device has a signal indicator light, observe whether the indicator light shows normal working status.
-
Check the connection status: Make sure the fiber optic cable and power cord are firmly connected and not loose or disconnected.
By correctly connecting optical fiber cables and power cords, you can ensure the normal operation of the optical network terminal and realize the transmission of optical signals and power supply to the equipment. Use caution during operation to avoid damage or damage to the equipment and cables.
IV. Connect to broadband router or optical modem
Connecting the optical network terminal to the broadband router or optical modem is a key step to ensure a smooth network connection.
1. Connect using an Ethernet cable:
-
Choose the appropriate port: Select an idle Ethernet port on the broadband router or optical modem.
-
Connect the cable: Plug the other end of the Ethernet cable connected to the optical network terminal into the selected port.
-
Tighten the connection: Make sure the connection is secure to avoid loosening during use.
2. Check connection status:
-
Observe the indicator lights: Observe the indicator lights at the connection port between the optical network terminal and the router or optical modem to confirm whether the connection is normal.
-
Confirm network activity: Confirm whether the Ethernet connection status is normal on the device. There is usually an indicator light or connection status display.
3. Configure router or optical modem:
-
Log in to the router management interface: Open the browser, enter the management interface address of the router or optical modem, and log in to the management interface.
-
Set network parameters: Set wireless network name (SSID), password, network encryption method and other parameters as needed.
-
Connect other devices: After completing the setup, you can connect other devices to the router or optical modem using a wireless connection or an Ethernet connection.
V. Test connection and network settings
Once the connection is established, testing the connection and network settings is a critical step to ensure stable operation of the network.
1. Test connection:
-
Use network equipment: Use a device connected to the router or optical modem to surf the Internet, browse the web, etc., and confirm whether the connection is normal.
-
Ping test: Execute the ping command in the command line or terminal to test the connectivity with other network devices and ensure that the network connection is normal.
2. Network settings:
-
Wi-Fi settings: Wireless devices such as mobile phones and tablets can search for the Wi-Fi name (SSID) you set, enter the password and connect to the network.
-
Password settings: Make sure the passwords you set are strong enough to protect your network security.
-
Access control: Set access control lists (ACLs) or parental controls as needed to manage devices connected to the network.
Through the above steps, you can ensure the stability of the connection and the correctness of the network settings, providing a good experience for your network connection.
Summary:
Thank you for reading this blog and understanding the steps and precautions for connecting optical network terminals. I hope this blog can help you successfully connect optical network terminals and ensure a stable and reliable network connection. Choosing high-quality optical network terminal equipment, coupled with correct connections and settings, will provide you with a fast and stable network experience.